Windows 10 has lots of useful features, but not all the users are aware of those features. One feature out of them is Quiet Hours. If you have a question in mind, i.e., What are Quiet Hours on Windows 10? The explanation is The Quiet Hours settings is a useful feature of Windows 10 using which you can turn off the annoying notification within 12:00 am and 6 am. You can also filter what gets through it. Quiet Hours is the same feature available in Windows 8. When the same feature (Quiet Hours) in Windows 10 is enabled, the notification service will be turned off so that you can complete your work without any distraction.
Windows 10 Quiet Hours Settings
In case, you want to Windows 10 Quiet Hours feature, but don’t know how to do that? In the following lines, you will read about all the possible ways on how to configure Quiet Hours in Windows 10. So without wasting a single second why don’t you start reading the article:
Enable Quiet Hours from Action Center
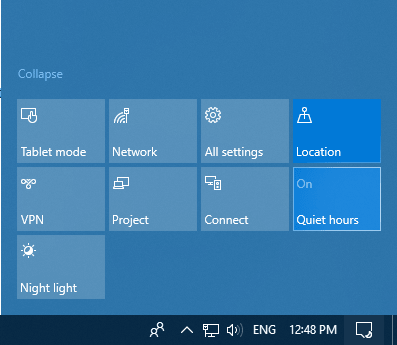
For that, just click on the Action Center icon available on the bottom right side of the Windows 10 Taskbar. It looks similar to speech bubble.
When action center bar appears, click on the Quiet Hours button to enable it. Anf if you want to turn it off, then click on the same button.
When you enable the Quiet Hours feature, the action center icon will start showing you moon icon on the button. In case, Quite Hours option in the Action Center is not available on the Action Center; then you need to add Quite Hours option in the Action Center. For that:
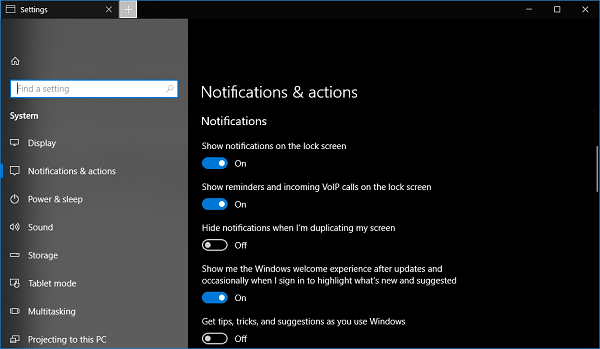
Launch Settings app -> System -> Notification & Actions.
On the right side, you will see the preview of Action Center. Here you need to click on the link which reads “Add or remove quick actions.”
In the next window, you need to make sure that switch next to Quiet Hours action is turned on. In case, it does not then turn it on by using the switch.
After making above change, again open the Action Center, this time Quiet Hours action will be available for sure.
Enable Windows 10 Quiet Hours Quickly (Creator Update or Below)
In case, you’re running Windows 10 build older then Windows 10 Fall Creators Update, then you can turn ON and OFF Quiet Hours in Windows 10 quickly just by making a right click on the Action Center icon and from the context menu select “Turn on Quiet Hours.”
If the Quiet Hours in enable, you can follow the same procedure and select “Turn off Quiet Hours.”
Manage Quiet Hours in Windows 10 (Fall Creators Update)
In case, you have updated to Windows 10 Fall Creators Update; then you will find various options using which you can manage Quiet Hours in Windows 10. To reach the Quiet Hours settings. Here is what you need to do that:
- Launch the Setting app.
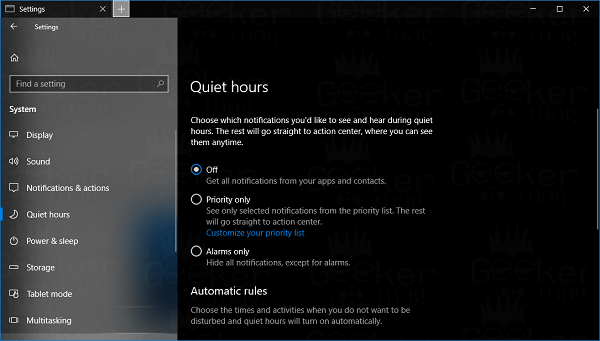
- Click on the System -> Quiet Hours. On the right side, there you will find lots of settings related to Quiet Hours feature.
Set Notification Settings for Quiet Hours
OFF – If you enable, then you will not see any notification from your apps and contacts. Priority only – If this option is selected that you will receive notification from the priority list and remaining notification will go to action center. Alarm only – If this option is enabled, this will hide all the notification, except for the alarms.
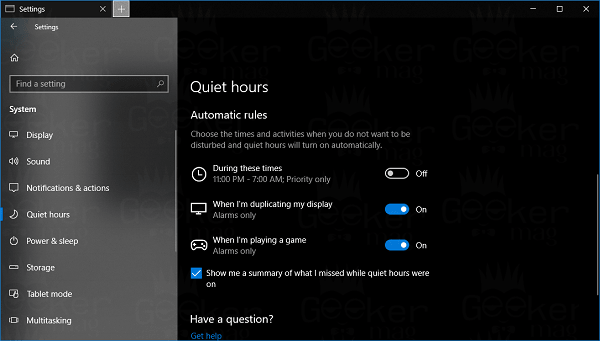
Set Automatic Rules for Quiet Hours
In automatic rules, you can select the time when you would like to enable Quiet Hours to feature automatically. If During these times – If this option is enabled, then the Quiet Hours feature will be enabled during 11:30 PM – 7:00 Am. This is named as Priority only setting. When I’m duplicating my display – When you’re duplicating your display, then Quiet Hours feature will be enabled automatically. But you will receive notification of alarms. When I’m playing a game – When you’re playing games on the PC, then Quiet Hours feature will be enabled and you will not receive notification except for alarms. In case, you want to know what you have missed when Windows 10 Quiet Hours feature is enabled, then make sure to tick mark the box for the option which reads “Show me a summary of what I missed while quiet hours were on.” In case, you want to stop notification receiving notification from a particular application, then here is what you need to do:
- Open the Settings app by pressing WIN + I keyboard combination.
- After that click on System -> Notification & Actions. On the right side, under Notification heading, you will find different options related to settings. Use the switches to enable or disable the notification.
You can use the switch to turn off or on the notification for the individual application.
On this Quiet Hours Settings page, you just need to play a little with the options, and I’m sure you will be able to balance notification and achieve guaranteed silence. That’s all about Windows 10 Quiet hours settings.